

The Stylish Halloween Witch
Equipment
Black sugar florist paste
White sugar florist paste
Edible paste colours: Red, Yellow, Green, Pink, Purple, Black
Long wooden skewer
Toothpicks
Small Round Dummy Tier
Edible glue
Rolling Pin
5cm Round Cutter
Palette Knife
Bone tool
Red Cherry Edible pen
Wire Cutter
Edible Glaze Spray (optional) or a bit of water
Very fine brush and a normal size brush
Royal Icing (optional)
Halloween Stencil (I suggest spiders or bats)
Orange Sugar paste (or White sugar paste mixed with edible orange paste colour)
Vodka (or lemon juice)
THE WITCH


1. Lower Body: Shape a chunky piece of Black sugar florist paste into a long cone for the skirt. Brush a long wooden skewer with a little bit of edible glue and insert it into the cone, leaving 5cm protruding from the base. Position the skirt onto a dummy round tier.
2. Upper Body: Now that your lower part is positioned, make the upper part by shaping another chunky piece of Black sugar florist paste into a pear shape. Flatten the pear shape paste with your hands and press gently to create the breast. Using your palette knife (or a toothpick) make 2 indents to create a V-shape dress. Now glue your upper part to the skirt as shown in picture. Flatten the shoulders with your thumb and finger.To make the Neck: Shape some Green sugar florist paste into another small cone to make the neck (to make the green colour, I have used a Holly Ivy sugar florist paste and added a bit of kiwi edible paste colour, but you can mix your White sugar florist paste with an edible green paste colour). Insert the cone around the skewer and glue it to the dress. Now roll out a tiny bit of Green sugar florist paste and cut out a small triangle for the witch’s chest. Glue it on top of the V-shape indents.


3. To make the witch’s head: Shape a piece of Green sugar florist paste into an oval shape. Flatten it a bit with your hands and press gently with your finger to create holes for the eyes. To make the nose: Starting from a chunky cone, just gently shape it to create a bended nose as in picture. Flatten the wider end and secure it above the mouth with some edible glue. To make the ears: Make two small balls of Green sugar florist paste. Press gently on one side with your bone tool to shape them. Attach them with some edible glue on either side of the head level with the nose. For the mouth: Use a red cherry edible pen to design the mouth and mark it with your palette knife to make a smile. To make the eyes: Make two small thin sausages with some Black sugar florist paste and attach them with some edible glue. Attach the head on top of the body with edible glue.
4. Sleeves: Shape two chunky pieces of Black sugar florist paste into cones. Push your bone tool into the wider end. Make creases over the sleeves with a toothpick. Secure the sleeves to the side of the body with edible glue.


5. For the creases on the skirt: Roll out a thin layer of Black sugar florist paste. Cut it to create a rectangular (don’t worry too much if it’s not perfect, you will probably need to cut it a little bit more once positioned). Now pinch one of the sides between your fingers to create 3-D creases. Attach it to the lower body. Repeat the process until you have all parts of the lower body covered.
6. Hair: Shape some Purple sugar florist paste (I have used White sugar florist paste and then coloured it with some edible purple paste colour) into long cones of various sizes, then flatten them down. Add hair lines with a toothpick and make some waves in the paste. Repeat the process with some White sugar florist paste in order to have different hair colours. Start by sticking them in the centre of the back of the head and then move towards the ears. You can create different hair styles, according to your preferences. I also made some thick orange sausages and then curl them at the end as in picture.


7. Arms: Roll some Green sugar florist paste into two sausages for the arms. Flatten one end of each arm. With your palette knife make four cuts in the hands to make fingers and thumb. Secure the top of each arm inside each sleeve and attach only one hand (left one) to the hip with some edible glue. The right hand can be a little bit lifted from the hip as we will then have to position the cat just right below it.
8. Belt (optional): Roll out a piece of Lilac sugar florist paste (I have made the Lilac starting from White sugar florist paste and then coloured it with a tiny bit of edible purple paste colour). Cut out a long strip. Attach it around the waist with some edible glue.

9. Hat: Roll out some Black sugar florist paste and cut out a disc with a 5cm round cutter. Shape some Black sugar florist paste into a long cone and flatten the base. Bend the top of the hat as shown in picture using your thumb and finger, then attach it to middle of the disc with edible glue. Before attaching the hat to the witch’s head, check that you only have a tiny piece of the wooden skewer coming out from the head, long enough to insert the hat but not too long to come out from the hat. In case your wooden skewer is too long, just cut it with a wire cutter at the desired length. Attach the hat to the top of the head with edible glue.

THE BLACK CAT


1. Body: Shape a chunky piece of Black sugar florist paste into a cone for the lower body. Brush a toothpick with a little bit of edible glue and insert it into the cone. If necessary, cut out the toothpick to the desired length.
Now roll out a tiny piece of White sugar florist paste and cut out a triangle to be positioned on the front of the body to create the belly.
Paws: Shape small pieces of Black sugar florist paste into 4 balls. Flatten and glue one side of each ball. Attach them as in picture and make 2 indents on each paw using a toothpick.
2. Head: Shape some Black sugar florist paste into a ball. Pinch two sides of the ball to create the furry cheeks. Make 2 indents on each side with a toothpick. Create 2 small holes for the eyes with the end of a paintbrush, 1 hole for the nose and a little vertical mark from the nose to the mouth. Brush a little edible glue inside all of them.
To make the Nose: Cut out a small pink triangle from a rolled out Pink florist paste and attach it into the nose hole (I have made the pink colour starting from White sugar florist paste and mixing it with edible pink paste colour).
To make the Ears: Divide some Black sugar florist paste in half and shape each piece into a triangle. Repeat the process with some Pink sugar florist paste. Glue the pink triangles on top of the black ones. With a toothpick push gently to make a mark as in picture. Trim the bases level and attach them to the top of the head with edible glue.
Eyes: Make 2 tiny Yellow sugar florist paste balls and insert them into the eyeholes. With a black edible pen draw the pupils (I have made the yellow colour starting from White sugar florist paste and mixing it with edible yellow paste colour).
Whiskers: Shape a tiny bit of Black sugar florist paste into 4 small sausages. Curl the ends and attach them to the cheeks with edible glue. Repeat the process in case you want to add some fur on top of his head and neck.

3. You can now spray your witch’s dress with an edible glaze spray or brush it with a little bit of water, just to make it look more real and shiny.

DUMMY TIER
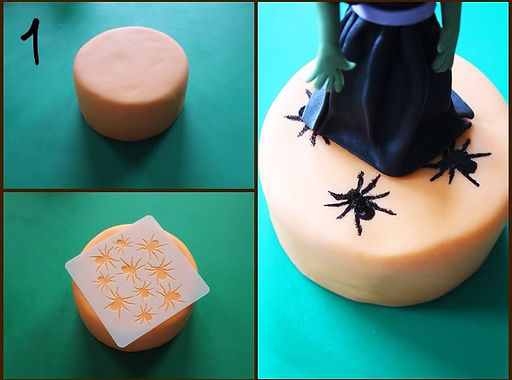
1. Cover your dummy tier with Orange sugar paste. I have made the orange colour by adding some orange edible colour to my white sugar paste. You can also create the same colour by mixing red and yellow edible colours.
Once the paste is dry, position your preferred Halloween stencil on top of your dummy. I have used this one with spiders.
Mix a bit of black edible paste colour with a little bit vodka (or lemon juice) and with a fine brush design the spiders following the stencil.
Insert the witch onto your dummy tier and glue the cat next to her. If you wish you can secure the witch with a dot of royal icing.
Optional Decoration:

Witch’s Belt Buckle: Make a very tiny Orange sugar florist paste ball. Using a toothpick make some indents to make the ball similar to a pumpkin. Curl a sausage of Green sugar florist paste and attach it on top of the pumpkin.


