
Enchanted Woodland Gnome Cake

Featured in Cake Decorating Heaven magazine. You can also find this tutorial on Cake Decorating Heaven's website:
PART I
THE TRUNK CAKE
For the Cake
-18cm (7in) round deep cake of your choice
-26cm (10in) round cake drum board
To decorate
-light green ribbon, 15mm width
-liquid food colours:
dark green
dark brown
teddy bear brown
-royal icing
-mint green paste food colour
-light brown, light blue, black, red and white sugar paste
-dark modelling chocolate
Special Equipment
-airbrush and cleaning jar
-small and medium ivy leaf plunger cutter
-flower/ leaf shaper tool
-wood grain impression mat
-small flower plunger cutter
-small heart shape plunger cutter
-2 paintbrushes (small and medium)
-edible glue
-turntable
-double sided sticky tape
-cobblestone impression mat (optional)
-fairy door and window mould (optional)
-gelatine spray (optional)
-piping nozzle no.233
-small round cutter
-toothpicks
-mini palette knife
-rolling pin
PART II
THE GNOMES
For the Gnomes
-white, red, brown, black modelling paste
To decorate
-aqua edible concentrated gel food colour
-skintone, grape violet, liquorice black, honey gold, Christmas red, turquoise paste edible food colours
-edible glue
-very berry and peach edible shimmers
-gold edible dust
Special Equipment
-small round polystyrene
-flower/ leaf shaper tool
-bone modelling tool
-toothpicks
-rolling pin
-small square plunger cutter
-3 different size brushes (small, medium, large)
-mini palette knife


PART I
1. Start by covering the 7in cake with white sugar paste. Cover the board with white sugar paste.
2. Now place the board on top of your turntable and with your airbrush (‘Light’ mode ON) start colouring the board with dark green edible colour by making circular movements with your airbrush. Once you have coloured the whole board in green, add a good amount of dark brown edible colour and airbrush the board giving it a good nuance similar to the soil in the woods.
3. Leave your board to dry a little bit. In the meantime, model some pieces of white sugar paste in the shape of sausages and stick them, with a little bit of edible glue, to the sides of the cake to create the trunks. Place some pieces on the whole top edge of the cake, sticking them all around it.
4. Using the flower/leaf shaper tool, make some random lines on the sides of your cake as to resemble the real wood grains, except from the upper part where you will need to make several circles to resemble a real cut trunk.
5. Put a bubble of royal icing onto your board and stick the cake on it. With edible glue, stick some more pieces of white sugar paste at the base of the cake and shape them as tree roots.


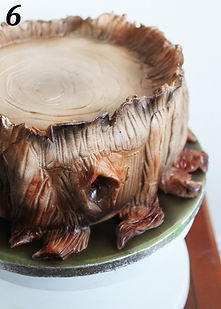

6. Place the board with the cake on top of your turntable and with the airbrush start colouring the cake adding few drops at a time of teddy bear brown. It is important to colour the cake by making light and small circular movements with your airbrush. By varying the distance you hold the airbrush from the surface, you can decide the intensity of the colours on the cake. Repeat the same technique with the dark brown.
7. Once the whole cake is coloured, start making the fairy door. Roll out a thick piece of white sugar paste, apply the sugar paste onto the wood impression mat and roll over with your rolling pin making sure to press hard enough for the design to remain impressed. Shape the piece as to form a door. With your airbrush colour the door in the same way you coloured the cake.
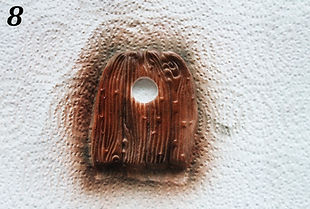
8. Use the small round cutter now to create a hole in the upper part of the door.
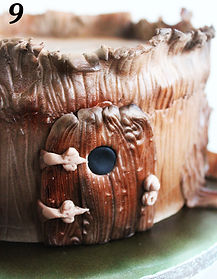
9. Stick the fairy door to the cake by using some edible glue.
Roll out a small amount of black sugar paste. With the same small round cutter cut a little piece of black sugar paste and put it into the hole in the door. At this point, if you wish, you can start adding as many details as you like! You can create a door knob and a key hole for example.

10. Use the mould to create the fairy window but if you do not have the mould you can create the window by using the same technique used for making the door. With a small heart plunger cutter, cut out 2 hearts from the window leaving 2 heart shaped holes. Stick the window onto your cake using small amounts of edible glue. Roll out light blue sugar paste then use the heart plunger cutter to cut out 2 hearts. Insert them into the heart shaped holes you made before.
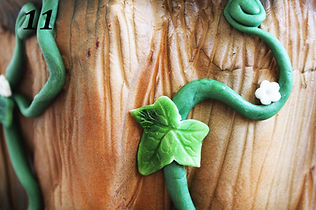
Now take some green sugar paste and start modelling it with your hands to create some green branches to be positioned around the cake wherever you like.
11. Roll out some white sugar paste to 5mm, then with the ivy plunger cutters cut some ivy leaves (small and medium). Add few drops of green colour to your airbrush and colour the leaves by making a bit of pressure to darken the edges. Attach the leaves to the cake with tiny amounts of edible glue.

12. To make the mushrooms: take small amount of red sugar paste and shape it as a cone. Now take a small piece of white sugar paste and shape it as a smaller cone. This is going to be the base of the mushroom. Stick the two cones together, putting the red one on top of the white one. Add some white sugar paste dots to the hat of your mushroom.
To make the flowers: simply roll out a small amount of white sugar paste and cut out some flowers using the flower plunger cutter.
To make the grass effect: mix the royal icing with mint green paste food colour. Once you have reached the desired shade, put the piping nozzle no 233 into the piping bag followed by the royal icing. Squeeze the royal icing out of the bag onto the board, close to the branches of your tree cake.
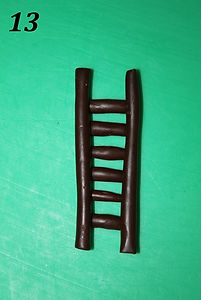
13. To make the ladder: Create 2 dark modelling chocolate shaped sausages. Create 6 smaller shaped sausages (which are going to be your steps). Position the 2 bigger pieces parallel to each other and stick the smaller pieces at the back of the bigger pieces.
To make the stone walkway: Mix some black sugar paste with some white. Roll it out and apply it onto the cobblestone impression mat. Remove the sugar paste form the mat and stick it on the board close to the door.

14. To make the dewdrops: spray some gelatine on a small plate. Using a cocktail stick take some gelatine and apply it to the green branches.
PART II
Female Gnome


1. Start by coloring a medium size ball of white modelling sugarpaste with the aqua gel.
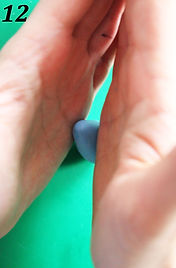
2. Shape the ball to create the skirt of the female gnome.

3. Insert a toothpick in the skirt and place it onto your small round polystyrene.
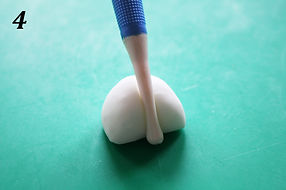
4. With your bone modelling tool shape a small piece of white modelling sugar paste to create the chest. Place the tool in the middle of the sugar paste and press a little bit as to create a line.

5. Now take 2 little pieces of sugar paste and shape them like sausages to create the arms. Cut one of the extremity of your pieces and with your finger flatten the other extremity which is going to be the upper part of the arm.
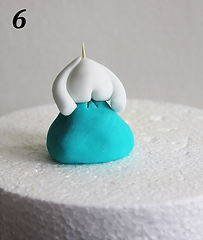
6. Attach the chest on top of the skirt with some edible glue. Attach the arms to the sides.
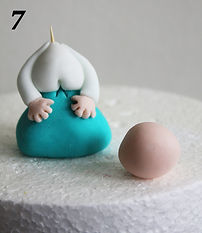
7. Now that you have created the body, concentrate on the head and hands.
Take a ball of white modelling sugar paste and colour it using the skintone colour (take a big piece as you will need it to create both the head and the hands). To make the hands take just 2 tiny little balls of your coloured sugar paste and using your mini palette knife shape the fingers out of them. To make the head just prepare a ball of your skintone coloured sugar paste which needs to be in proportion with the rest of the body.
Attach the hands at the end of the arms using some edible glue.
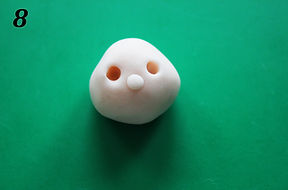
8. With the back of your brush make the holes for the eyes and attach a small ball of sugar paste to create the nose.


9. Place 2 small balls of white sugar paste inside the holes for the eyes. Using a toothpick and liquorice black colour make black tiny dots onto the white rounds to create the eyes.
With a toothpick and a small amount of Christmas red design the mouth.
10. With the liquorice black and a toothpick design the eyebrows and the lashes. Now using the peach edible shimmer make dots to colour the cheeks. With the very berry edible shimmer make a dot on her nose.
Roll out a small amount of white sugar paste and attach it to the head to create the hair.
Now colour a medium size ball of white sugar paste with the paste edible grape violet. Roll out the violet paste and attach it to the head on top of the hair to create the scarf.
11. Roll out some red modelling sugar paste and create the design of the dress. Cut out some small red sugar paste pieces with the mini palette knife and attach them to the dress. Make some tiny red dots with a toothpick and Christmas red.

12. To make the hat, mix some turquoise and grape violet and shape a small ball into a cone using the palm of your hands.
13. Insert half a toothpick into the gnome’s head and attach the hat with some edible glue.
Male Gnome
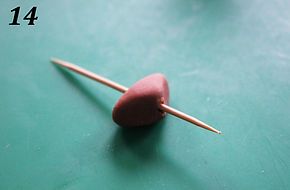
14. Take a small amount of brown modelling paste and create a triangle. Insert a toothpick in it.
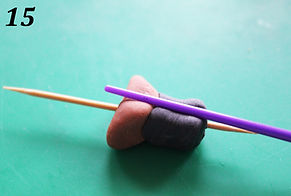
15. Now take some black modelling paste and attach it to the brown triangle. Using the back of your brush create a line to separate the legs.


16. Put the legs on your polystyrene and attach 2 small black sugar paste balls at the base to create the feet.
17. Colour a ball of white sugar paste with some honey gold colour and create the body. Roll out some brown modelling paste and cut out a strip to create the belt. With the small square cutter plunger create the buckle and colour it with gold edible dust.
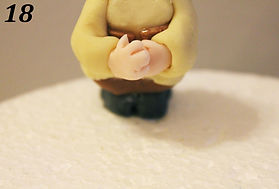
18. Colour some white modelling paste with the skintone colour and, in the same way you have created the arms of the female gnome, create now the arms for him, hands and face. Attach the arms and hands to the body.
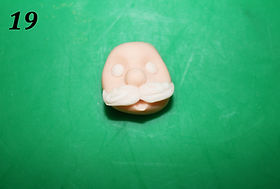
19. Make white moustaches and stick them to the gnome’s face.

20. Stick the face to the body and create the beard with white modelling sugar paste. Create a red hat with the same technique used for the female gnome’s hat. Insert half a toothpick into the gnome’s head and place a red hat on his head.
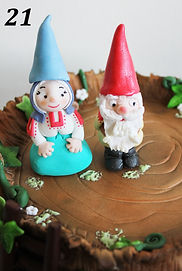
21. To secure your gnomes to the cake, squeeze white royal icing exactly where you want to position them. Insert the gnomes into the cake and remove the excess of royal icing.
TIPS:
-
When using the airbrush use more pressure if you want to create a darker effect on particular points of the cake and to give more depth and a real look to your trunk cake.
-
Add as many details as you like to give life to your cake.
-
If you are creating this cake for children and you would like to have all parts of the cake to be safe, substitute toothpicks with dry spaghetti inside of the gnomes.